
En el articulo anterior vimos toda la parte teorica de Kubernetes. Ahora pretendo mostrarles algo mas practico para tener una idea sobre como funciona un cluster de kubernetes.
Escenario practico
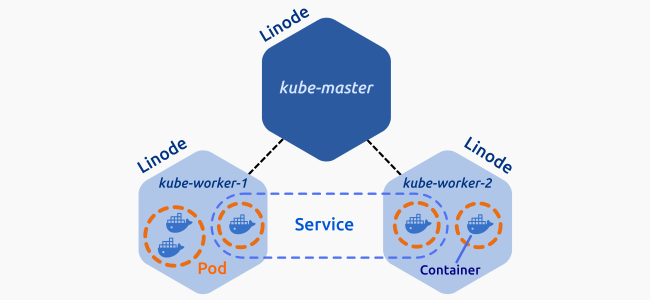
En nuestro caso práctico de instalación y configuración de kudeadm tendremos el siguiente escenario que se compone por tres nodos, de los cuales uno de ellos es el master y los otros dos son nodos que sirven al master. La intraestructura la vamos a montar sobre Azure y seran 3 VM con Ubuntu 16 LTS. La siguiente imagen muestra como es el escenario.
Instalacion de Docker
En cada nodo vamos a instalarle el motor de Docker. En este blog hay un capitulo dedicado a su instalacion. Les dejo el link de la documentacion oficial para que lo puedan hacer:
Instalacion y Configuracion de Kubeadm
Para comenzar tendremos que instalar las aplicaciones básicas para Ubuntu.
Antes vamos a cambiarnos al usuario root:
sudo su -
apt-get update && apt-get install -y apt-transport-https
Descargamos la clave GPG de kubernetes.
curl -s https://packages.cloud.google.com/apt/doc/apt-key.gpg | apt-key add -
Añadiremos el repositorio
cat <<EOF >/etc/apt/sources.list.d/kubernetes.list
deb http://apt.kubernetes.io/ kubernetes-xenial main
EOF
Actualizamos paquetes para incluir los de kubernetes.
apt-get update
Editamos el archivo host e ingresamos el nombre y la ip tanto del master como de todos los nodos del cluster:
vim /etc/hosts
Vamos a realizar la instalación de los paquetes necesarios para kubeadm.
apt-get install -y kubelet kubeadm kubectl
Editamos el archivo vim /etc/systemd/system/kubelet.service.d/10-kubeadm.conf y agregamos la linea:
Environment="cgroup-driver=systemd/cgroup-driver=cgroupfs"
Una vez que se terminaron de instalar los paquetes anteriores, vamos a ejecutar kubeadm.
Esta ejecución solamente se realiza en el equipo que va a ser master(Master).
Si usamos el proyecto de red Flannel debemos ingresar al comando kubeadm init el parametro --pod-network-cidr=10.244.0.0/16
kubeadm init --pod-network-cidr=10.244.0.0/16 --apiserver-advertise-address=10.1.0.4
Nota 10.1.0.4 es la ip del master.
Una vez que ejecutamos el comando kubeadm init deberiamos ver algo como lo siguiente:
root@k8smaster:~# kubeadm init --pod-network-cidr=10.244.0.0/16 --apiserver-advertise-address=10.4.1.5
[init] Using Kubernetes version: v1.13.1
[preflight] Running pre-flight checks
	[WARNING SystemVerification]: this Docker version is not on the list of validated versions: 18.09.0. Latest validated version: 18.06
[preflight] Pulling images required for setting up a Kubernetes cluster
[preflight] This might take a minute or two, depending on the speed of your internet connection
[preflight] You can also perform this action in beforehand using 'kubeadm config images pull'
[kubelet-start] Writing kubelet environment file with flags to file "/var/lib/kubelet/kubeadm-flags.env"
[kubelet-start] Writing kubelet configuration to file "/var/lib/kubelet/config.yaml"
[kubelet-start] Activating the kubelet service
[certs] Using certificateDir folder "/etc/kubernetes/pki"
[certs] Generating "ca" certificate and key
[certs] Generating "apiserver" certificate and key
[certs] apiserver serving cert is signed for DNS names [k8smaster kubernetes kubernetes.default kubernetes.default.svc kubernetes.default.svc.cluster.local] and IPs [10.96.0.1 10.1.0.4]
[certs] Generating "apiserver-kubelet-client" certificate and key
[certs] Generating "front-proxy-ca" certificate and key
[certs] Generating "front-proxy-client" certificate and key
[certs] Generating "etcd/ca" certificate and key
[certs] Generating "etcd/server" certificate and key
[certs] etcd/server serving cert is signed for DNS names [k8smaster localhost] and IPs [10.1.0.4 127.0.0.1 ::1]
[certs] Generating "etcd/healthcheck-client" certificate and key
[certs] Generating "etcd/peer" certificate and key
[certs] etcd/peer serving cert is signed for DNS names [k8smaster localhost] and IPs [10.1.0.4 127.0.0.1 ::1]
[certs] Generating "apiserver-etcd-client" certificate and key
[certs] Generating "sa" key and public key
[kubeconfig] Using kubeconfig folder "/etc/kubernetes"
[kubeconfig] Writing "admin.conf" kubeconfig file
[kubeconfig] Writing "kubelet.conf" kubeconfig file
[kubeconfig] Writing "controller-manager.conf" kubeconfig file
[kubeconfig] Writing "scheduler.conf" kubeconfig file
[control-plane] Using manifest folder "/etc/kubernetes/manifests"
[control-plane] Creating static Pod manifest for "kube-apiserver"
[control-plane] Creating static Pod manifest for "kube-controller-manager"
[control-plane] Creating static Pod manifest for "kube-scheduler"
[etcd] Creating static Pod manifest for local etcd in "/etc/kubernetes/manifests"
[wait-control-plane] Waiting for the kubelet to boot up the control plane as static Pods from directory "/etc/kubernetes/manifests". This can take up to 4m0s
[apiclient] All control plane components are healthy after 22.502291 seconds
[uploadconfig] storing the configuration used in ConfigMap "kubeadm-config" in the "kube-system" Namespace
[kubelet] Creating a ConfigMap "kubelet-config-1.13" in namespace kube-system with the configuration for the kubelets in the cluster
[patchnode] Uploading the CRI Socket information "/var/run/dockershim.sock" to the Node API object "k8smaster" as an annotation
[mark-control-plane] Marking the node k8smaster as control-plane by adding the label "node-role.kubernetes.io/master=''"
[mark-control-plane] Marking the node k8smaster as control-plane by adding the taints [node-role.kubernetes.io/master:NoSchedule]
[bootstrap-token] Using token: is5u7s.09yreg0u1bnu4qpn
[bootstrap-token] Configuring bootstrap tokens, cluster-info ConfigMap, RBAC Roles
[bootstraptoken] configured RBAC rules to allow Node Bootstrap tokens to post CSRs in order for nodes to get long term certificate credentials
[bootstraptoken] configured RBAC rules to allow the csrapprover controller automatically approve CSRs from a Node Bootstrap Token
[bootstraptoken] configured RBAC rules to allow certificate rotation for all node client certificates in the cluster
[bootstraptoken] creating the "cluster-info" ConfigMap in the "kube-public" namespace
[addons] Applied essential addon: CoreDNS
[addons] Applied essential addon: kube-proxy

Your Kubernetes master has initialized successfully!

To start using your cluster, you need to run the following as a regular user:

  mkdir -p $HOME/.kube
  sudo cp -i /etc/kubernetes/admin.conf $HOME/.kube/config
  sudo chown $(id -u):$(id -g) $HOME/.kube/config

You should now deploy a pod network to the cluster.
Run "kubectl apply -f [podnetwork].yaml" with one of the options listed at:
  https://kubernetes.io/docs/concepts/cluster-administration/addons/

You can now join any number of machines by running the following on each node
as root:

  kubeadm join 10.1.0.4:6443 --token is5u7s.09yreg0u1bnu4qpn --discovery-token-ca-cert-hash sha256:ab64790e4584743e4485da4e7fd06867fbf0fdcea8bad016a3e09b881b558e09
Veremos que al final de la ejecucion nos aparece un comando kubeadm join el cual debemos guardar para enlazar los nodos al master
kubeadm join --token 8212ea.b01e65b8129b03eb 10.0.0.15:6443 --discovery-token-ca-cert-hash sha256:54e3489945be576a4edbd3d6f268f5f8bcf8e8ece016709b12060df7828ba751
Configuración de Kubeadm (Entorno de usuario)
Vamos a configurar el entorno de usuario para ello vamos a realizar lo siguiente:
Nota: Tengan en cuenta que lo que vamos a ejecutar se hace solo en el master
mkdir -p $HOME/.kube
Vamos a configurar los archivos de configuración
cp -i /etc/kubernetes/admin.conf $HOME/.kube/config
Vamos a cambiar los permisos a dicho directorio y con eso ya tendremos configurado el entorno de usuario.
chown $(id -u):$(id -g) $HOME/.kube/config
En caso que tengamos que reiniciar la configuracion ejecutaremos el comando:
kubeadm reset
Instalacion del POD Network
Deberemos instalar un pod network para comunicar el master con los demas nodos que en nuestro caso es para permitir la comunicación con los otros dos nodos. Existen diferentes proyectos que proporcionan pod network para kubernetes, algunos de ellos también apoyan la política de red, siendo en nuestro caso en el que vamos a instalar “Flannel” y se realiza con el siguiente comando (se ejecuta solo en el master).
Les dejo el link para que tengan como guia ya que hay otros proyectos de red (flannel es el mas sencillo):
kubectl apply -f https://raw.githubusercontent.com/coreos/flannel/bc79dd1505b0c8681ece4de4c0d86c5cd2643275/Documentation/kube-flannel.yml
Luego ejecutamos:
sysctl net.bridge.bridge-nf-call-iptables=1
Luego verificamos que los Pods se ejecutan correctamente:
kubectl get pods --all-namespaces
Deberiamos ver ula siguiente salida:
root@k8smaster:~# kubectl get pods --all-namespaces
NAMESPACE     NAME                                READY   STATUS    RESTARTS   AGE
kube-system   coredns-86c58d9df4-l9tk4            1/1     Running   0          3m46s
kube-system   coredns-86c58d9df4-n6dfc            1/1     Running   0          3m46s
kube-system   etcd-k8smaster                      1/1     Running   0          3m5s
kube-system   kube-apiserver-k8smaster            1/1     Running   0          2m58s
kube-system   kube-controller-manager-k8smaster   1/1     Running   0          2m57s
kube-system   kube-flannel-ds-amd64-b57df         1/1     Running   0          98s
kube-system   kube-proxy-6vlrw                    1/1     Running   0          3m46s
kube-system   kube-scheduler-k8smaster            1/1     Running   0          3m2s
Instalamos el dashboard de kubernetes:
kubectl create -f https://raw.githubusercontent.com/kubernetes/dashboard/master/aio/deploy/recommended/kubernetes-dashboard.yaml
Les dejo los pasos para acceder al dashboard:
Union de los nodos
Para que puedan comunicarse los diferentes nodos con el master y viceversa tendremos que unir los distintos nodos ya que si no, estarían los tres nodos aislado y de esa forma no realizaría su cometido. Para ello vamos a introducir el siguiente comando en los otros dos nodos que se tienen que unir con el master(dicho comando es el que nos generó el master cuando se ejecuto el kudeadm init ).
Una vez que ejeutamos el comando join en ambos nodos, ya tendremos los dos nodos (nodo1 y nodo2) unidos al master.
Nodo1
root@k8snodo1:~# kubeadm join 10.1.0.4:6443 --token is5u7s.09yreg0u1bnu4qpn --discovery-token-ca-cert-hash sha256:ab64790e4584743e4485da4e7fd06867fbf0fdcea8bad016a3e09b881b558e09
[preflight] Running pre-flight checks
	[WARNING SystemVerification]: this Docker version is not on the list of validated versions: 18.09.0. Latest validated version: 18.06
[discovery] Trying to connect to API Server "10.1.0.4:6443"
[discovery] Created cluster-info discovery client, requesting info from "https://10.1.0.4:6443"
[discovery] Requesting info from "https://10.1.0.4:6443" again to validate TLS against the pinned public key
[discovery] Cluster info signature and contents are valid and TLS certificate validates against pinned roots, will use API Server "10.1.0.4:6443"
[discovery] Successfully established connection with API Server "10.1.0.4:6443"
[join] Reading configuration from the cluster...
[join] FYI: You can look at this config file with 'kubectl -n kube-system get cm kubeadm-config -oyaml'
[kubelet] Downloading configuration for the kubelet from the "kubelet-config-1.13" ConfigMap in the kube-system namespace
[kubelet-start] Writing kubelet configuration to file "/var/lib/kubelet/config.yaml"
[kubelet-start] Writing kubelet environment file with flags to file "/var/lib/kubelet/kubeadm-flags.env"
[kubelet-start] Activating the kubelet service
[tlsbootstrap] Waiting for the kubelet to perform the TLS Bootstrap...
[patchnode] Uploading the CRI Socket information "/var/run/dockershim.sock" to the Node API object "k8snodo1" as an annotation

This node has joined the cluster:
* Certificate signing request was sent to apiserver and a response was received.
* The Kubelet was informed of the new secure connection details.

Run 'kubectl get nodes' on the master to see this node join the cluster.
Nodo2
root@k8snodo2:~# kubeadm join 10.1.0.4:6443 --token is5u7s.09yreg0u1bnu4qpn --discovery-token-ca-cert-hash sha256:ab64790e4584743e4485da4e7fd06867fbf0fdcea8bad016a3e09b881b558e09
[preflight] Running pre-flight checks
	[WARNING SystemVerification]: this Docker version is not on the list of validated versions: 18.09.0. Latest validated version: 18.06
[discovery] Trying to connect to API Server "10.1.0.4:6443"
[discovery] Created cluster-info discovery client, requesting info from "https://10.1.0.4:6443"
[discovery] Requesting info from "https://10.1.0.4:6443" again to validate TLS against the pinned public key
[discovery] Cluster info signature and contents are valid and TLS certificate validates against pinned roots, will use API Server "10.1.0.4:6443"
[discovery] Successfully established connection with API Server "10.1.0.4:6443"
[join] Reading configuration from the cluster...
[join] FYI: You can look at this config file with 'kubectl -n kube-system get cm kubeadm-config -oyaml'
[kubelet] Downloading configuration for the kubelet from the "kubelet-config-1.13" ConfigMap in the kube-system namespace
[kubelet-start] Writing kubelet configuration to file "/var/lib/kubelet/config.yaml"
[kubelet-start] Writing kubelet environment file with flags to file "/var/lib/kubelet/kubeadm-flags.env"
[kubelet-start] Activating the kubelet service
[tlsbootstrap] Waiting for the kubelet to perform the TLS Bootstrap...
[patchnode] Uploading the CRI Socket information "/var/run/dockershim.sock" to the Node API object "k8snodo2" as an annotation

This node has joined the cluster:
* Certificate signing request was sent to apiserver and a response was received.
* The Kubelet was informed of the new secure connection details.

Run 'kubectl get nodes' on the master to see this node join the cluster.
Comprobación de la unión de los nodos con el master
Vamos a comprobar que tenemos los dos nodos unidos al master. Para ello vamos a ir al master y ejecutar el siguiente comando:
root@k8smaster:~# kubectl get nodes
NAME        STATUS   ROLES    AGE     VERSION
k8smaster   Ready    master   29m     v1.13.1
k8snodo1    Ready    <none>   6m51s   v1.13.1
k8snodo2    Ready    <none>   63s     v1.13.1
Final
Con esto hemos creado un cluster con kubernetes. Espero que les sea de utilidad.